Showing posts with label Tutorial. Show all posts

Sunday, February 9, 2020

Recover Data from RAW HDD Partition

Guys,

Make sure that your hard disk or thumb drive is still working. You can now recover a RAW partitioned hard disk or thumb drive by using the software called Testdisk

This is legit. It will help you to recover the partition and all the files. I have been there and I managed to recover all my files.

See this link for the step by step guide...

Download Testdisk from here


Wednesday, November 13, 2019

P9 and P9 Plus Update to Android Oreo

Guys just in case if you need to upgrade your Huawei P9 Plus or Huawei P9 to Android Oreo.

You phone must be installed with Android Nougat first. Then you need to rebrand the phone to update to Oreo.

Follow this instructions to rebrand and update to Android Oreo (only for Huawei's P9 and P9plus users) : 

Huawei P9 Plus :

https://forum.xda-developers.com/p9-plus/development/rebrand-update-tool-hwota7-p9-plus-vie-t3843930

Huawei P9 :

https://forum.xda-developers.com/p9/development/rebrand-update-tool-hwota7-p9-eva-t3820849

I'm using Huawei's P9 plus and I already tried the method and it worked like a charm. 

Monday, September 8, 2014

How to Restore Text Messages from SMS Backup + (Plus) in Android Kitkat 4.4.2

Okay...it's been a while since my last entry. Here goes..I know several of you guys trying to restore your text messages using SMS Backup + and suddenly after successfully restored, there is No text messages but only the sender's numbers right?

To be able to retrieve back your text messages, you have to download another application from Play Store called Permission Manager - App Ops ( you don't have to root your phone).


After you have already installed the app from the Play Store, open it and swipe to the left, just look for Personal Section and search SMS Backup +.


Open SMS Backup + and scroll down. Look for Write SMS/MMS...and switch it on or enable it.


After that, clear all the text messages in your inbox and try to restore again. That's it, I hope it will work because mine is working !! Some people say that this method might also be applicable to the SMS Backup & Restore app but I haven't try it. I'd rather stick to SMS Backup + because it will backup your texts to your google account. So..happy trying guys !!

Friday, June 22, 2012

White Cydia Icon Fix


For those who are/were experiencing this and dunno what to do.....here's a tip:

1. Open Cydia >>> Search for SBSettings and Install

2. For IOS 5.x users >>> After installation, go to Settings >>> Notifications and look for SBSettings.

3. Click the '>' and switch On the Notification Center

4. Slide the above Notification Banner down (the notification banner is located at the top of your ipad or iphone ie: the time, mobile's signal, battery area, just slide it down)

5. You will see something like this  

6. Respring your springboard. If you cannot see the Respring button, try to slide from left to right or right to  left (usually this will happen with Ipad)

* You can also use this method, if any of your app icons turn to White.

Hope this helps.

Cheers.

Prevent Itunes from Sync Automatically

I hate when Itunes automatically sync with my devices, I found this on few blogs and yeah it works.

1. Open Itunes from your computer

2. Choose Edit in the Menu Bar


3. Then Preferences

4. Chose the Device Tab

5. Tick the Prevent iPods, iPhones and Ipads from syncing automatically. Then OK.

Cheers.

Saturday, June 16, 2012

Android Market won't update to Google Play Store

Hi guys,

It has been a long long time since my last post. How are you guys doing? Thanks for your support. I received a lot of emails and comments on RA3. Keep on downloading and do please notify me if the link is dead !!

So enough with gaming ! Let's get serious.

This time, I'm having trouble with my Android phone. Downgraded my SG2 from ICS to Gingerbread 2.3.6. Problem with the Android Market wont updated itself to Google Play Store. Managed to solve this by hopping to several blogs and forums.

So here it is, 

Go to your Settings > Applications > Manage Applications > All and Scroll down to the Market and Clear Data or Cache.

Restart Market and Accept the Terms. It will update itself to Google Play Store.

If the icon won't change then you have to restart the phone.

Hope this helps. It works for me. :)

Cheers

Sunday, March 22, 2009

How to install Hamachi

There are few steps on how to install this application. I will guide you from scratch.

1. Download the HamachiSetup-1.0.3.0-en.zip from my blog (or you can also download the installer (.exe) from its official site.

2. Unzip the file (if you downloaded the zip file !). Extract it to the desktop.

3. Double click on the HamachiSetup-1.0.3.0-en.

4. The rest of the steps will be guided with pics :). The red square requires you to click the spot on the original installation's interface.


Click Next
5.

Yup click on the box and then Next
6.

Ok no red square means do not do anything. Take a look at this pic.
7.

Aha got several red squares means several clicks. Create the shortcut on the desktop will do. You dont have to start hamachi automatically. Then click Next.
8.

Yup check the disable vulnerable Win services over Hamachi and then Next.
9.

The default setting is the 2nd option. Change it to the 1st option and then Next.
10.

Click Install.
11.

Click Next
12.

Click Finish


You gonna see this kind of interfaces after finish installing.
13.

Close the guide and switch on Hamachi by clicking the On button.
14.

After you already switched it On, it will ask you to create and account. To proceed please create and account. Just put in any account name then click Create.


After you clicked the Create button, your Hamachi will look like this. Your hamachi will probe and sync itself.


Yeah now got yellow squares. You need to do nothing. If the 0.0.0.0 change to any other figure it means that your hamachi account is successfully created. You can also see your account name below the figure.
15.
Now click on the networking button. A menu will pop up. Then click on join an existing network if you want to join a network.
16.

In order to join a network, you need to know what is the network name and its password, the other network must also use Hamachi. After you already inserted the name and password click Join.

If you successfully joined a network, your interface will look something like this, maybe with few other more connections.
15.1.

You can also create a new network so that others can join you. In order to do so, please click the networking button and choose create a new network.
15.1.2.

Put you desirable network name and password. Then click Create. In order to make people join your network, you have to give them your network name and its password.

After finish installing and setting, you can now play games with other people from any parts in the world by using the multiplayer options.

I understand that some you guys will noticed that the Hamachi icon in the system tray keep on flashing. So to make it stops, follow this steps....

1.

Right click on the flashing Hamachi icon. A menu will pop up then choose New Message.
2.

A new window will pop up asking you to set a Master Password. Click Yes.
3,

Insert the field with your desirable password. Make sure the new password box and confirm password box have the same password. Then click Change.

A new message box will appear stating that you have already set your master password. Click OK.

Ok, now you can use Hamachi with no problem.

Monday, February 9, 2009

Uninstall MSN Messenger 2009

Msn Messenger 2009 doesn't come with uninstaller, so to uninstall:

1. Click the start button

2. Go to run

3. Paste this >>>>>> msiexec /x {0AAA9C97-74D4-47CE-B089-0B147EF3553C}

It will uninstall itself...

If the above method ain't working, please use this ZapMessenger.
DOWNLOAD

Monday, November 24, 2008

USB pin color codes

Just in case....

I just wanna put this on my blog. This is how you arrange the rear or front usb's panel wyres to the usb pin on you motherboard.


Friday, August 15, 2008

Network Cabling

I'm back again !

Today, I would like to show you how to make your own straight and crossover cable. It is so freaking simple.

Things that you need :

1. A crimping tool


2. A Cat5 UTP Cable


3. A Cable Tester


4. RJ45 Clip


The price is between RM0.30 - RM0.50 per pc.

Additional tools:

1. Wire Cutter
2. Scissors

Let's make a straight cable. There are two color codes standards for the Ethernet cable (T568A and T568B). As for me, I usually use the T568B standard.

T568B Color Codes:

Starting from your left:

1. Orange stripe
2. Orange
3. Green stripe
4. Blue
5. Blue stripe
6. Green
7. Brown stripe
8. Brown


* After finish arranging the color points (wires), make sure you cut it to the same length.
* Make sure the RJ45 clip is pointed away from you (as shown in the picture).
* Make sure all those colored points, are inserted correctly into its own layer (inside the RJ45).

Next....

1. It's time to use your crimping tool. There is a RJ45 slot on the tool. Put the RJ45 inside there, and crimp it until you hear a "click" sound. If you don't hear it, just pull it out (if you think it is crimped enough).

2. Now, make the other end of the Cat5 UTP cable with the same color codes. DIY please.

3. If everything is done, then you need the tester. Put both ends inside the RJ45 slot on the tester. Switch it on. Now you can see the LED starting to blink from 1 to 8 (accordingly). If you can see all the LEDs blinked from 1 to 8 meaning the cable is perfect. If you don't, you have to start from the beginning. Check the RJ45 clip and the color points !! Make sure each color point layers are clean and make sure both ends are using the same color codes (IF straight cable).

T568A Color Codes:

1. Green stripe
2. Green
3. Orange stripe
4. Blue
5. Blue stripe
6. Orange
7. Brown stripe
8. Brown


* Can you see the difference? It is similar to T568B, but the only changes are:

1. Orange stripe----------------- 1. Green stripe
2. Orange ---------------------- 2. Green
3. Green stripe ------------------3. Orange stripe
4. Blue ------------------------- 4. Blue
5. Blue stripe --------------------5. Blue stripe
6. Green ------------------------6. Orange
7. Brown stripe ------------------ 7. Brown stripe
8. Brown ------------------------ 8. Brown

Lol, I hope you can figure it out yourself unless you are color blind... :P

Next is the crossover cable. To make a crossover cable, use T568A and one end and T568B at the other end....

That's all.

Cheers

Saturday, June 14, 2008

Installing Windows XP from Scratch

Ready to format your own computer? DIY
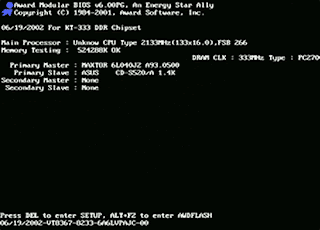
Firstly, enter your Bios setup. Usually, you can enter Bios setup by pressing the Delete button. However, it may vary depending on your system. Usually, branded computers uses some different buttons to enter its Bios setup. If you are not certain on how to enter your Bios setup using your branded computer, you can view few solutions here. If you still cannot enter the bios setup, please read your f**king manual or consult your vendor.
After you already enter the bios setup, look for the Boot tab. Enter the boot tab and choose CD-ROM, or DVD-ROM as your first boot device and put Hard Drive as your second boot device. Interface may vary depending on your system.
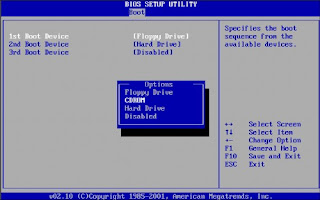
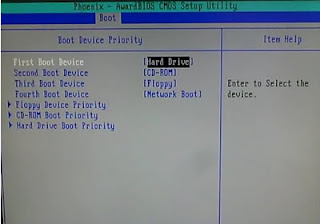
Save and exit your bios setup by pressing F10. 
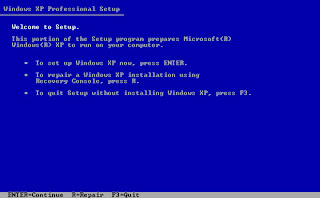
Again, it may vary depending on your system!
After you exited the Bios configuration, please make sure you Windows XP CD is in your CD/DVD Drive. Now, please pay attention on your screen because your system will be booting from your CD/DVD drive.
You will see a prompt that says, Press any key to boot from CD. So..please press any key, otherwise it will continue booting from your second boot device. If you missed this step, please reboot again or press CTRL+ALT+DEL.

Next, you going to see this screen,
Just watch it proceed to the next screen....
Now you are in the comfort zone. Starting from this point, you only need to follow all the instructions on your screen. Press Enter to setup Windows.
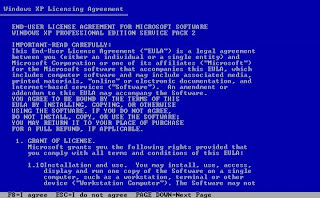
Nahh, you do not have to read the stupid crap, just press F8 for I agree to proceed to the next stage.

The system will now search for an installed operating system. If another operating system is found, the next stage will be like this.....
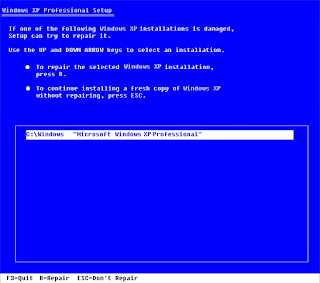
Press ESC, install a fresh copy of Windows XP. After you already pressed the button, it will show you the list of partitions that you have. If you want to delete the partition, press D and follow the instructions.

If you are using a New Hard Drive without any partition or any operating system or if you already deleted your partition, your next screen will be like this....
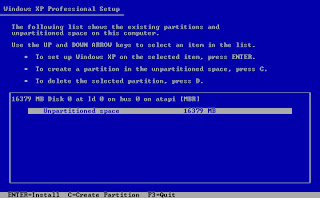
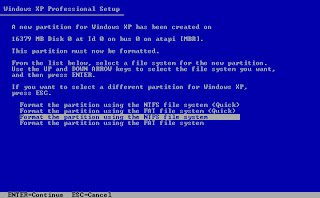
If you want to create a partition, For example, let's create partition C and D, let's say the space of your hard drive is 16379MB. Now, press C to create a partition and enter the amount of space you want for that partition, let's say 10000MB.
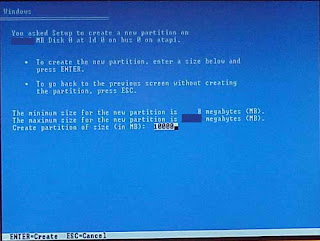
Press Enter to create the partition. After you have created the partition, select the unpartitioned space and press C again to create the next partition. Now, you can use the maximum space to create the last partition and press Enter. Now, there are 2 partitions on the list; C and D. Ignore the 8mb unpartitioned space. You can create more partitions if you have more spaces.

Now, select partition C and press Enter, it will ask you to format the partition. Use the default selection. Format the partition using NTFS file system and press Enter. Then, sit tight and watch the process.
After pressing the Enter button....
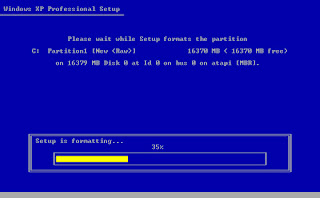
It will format and copy files from your CD/DVD drive. If theres a file that cannot be copied, please make sure that the CD is not scratched or dirty. If there are too many errors in copying files, it might point to a RAM or motherboard problem. Your system will restart after the formatting and copying process is complete.

Please remember that this time, you do not have to boot from your CD again. Your system will prompt you to boot from CD, just ignore it or you can change your first boot device to hard drive.
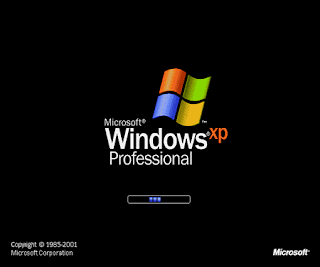
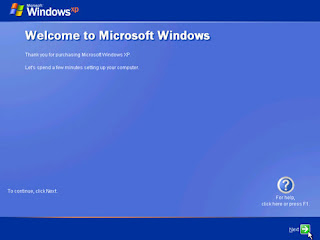
You will see the Windows XP boot screen, and when it enters, it will configure your settings for several minutes and a window will popup
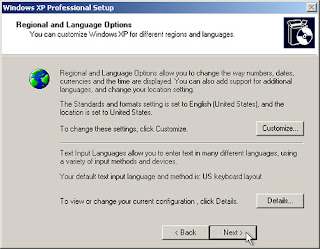
You can change the regional and language options if you want to, but to make it easier, just click Next
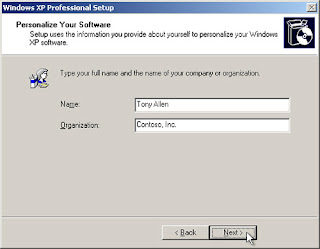
Enter your Name and Organization. It is okay to leave the organization's field blank. Click Next.
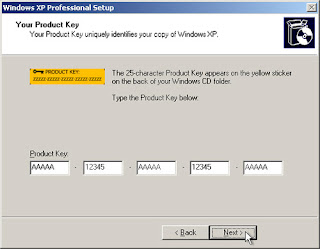
Enter your product key and click Next.
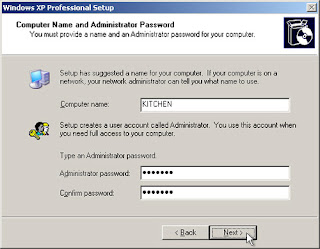
Enter your computer name (if you want another name instead of the default name). You can also leave the password's field blank and click Next.
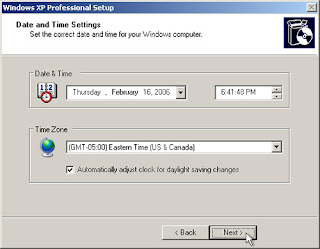
Set the date, time and your time zone. Click Next.
This stage may vary depending on your system. Some systems might skip this stage. Choose typical settings and click Next.
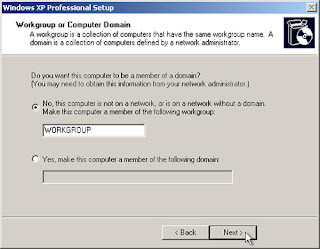
This is the last stage before you complete your installation. Name your workgroup or just leave it as Workgroup and click Next. The installations will take about 25-45 minutes depending on your system. It will restart after the installation is complete.

It will now prompt you again to hit any key if you want to boot from CD. Just ignore it.
Boot screen....
If everything is ok, you will see a message box just like the picture shown above, click OK to continue.
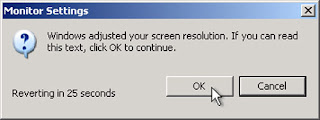
Just click OK will ya?
Uhm click Next :)
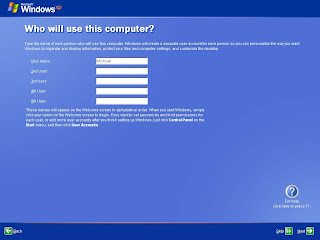
You must enter a name of a user for this Windows. If you are too lazy to figure out a name just put it as "User". Then click Next.
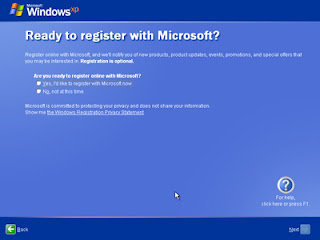
It will then ask you to register with Microsoft. Uhm choose No, not at this time.
Finally, click Finish and you are in your new Windows Xp. Tada......
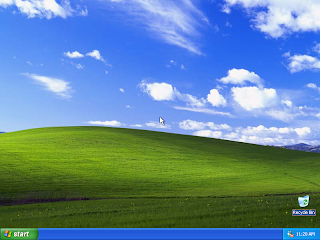
See...it is not that difficult right? Lol

Cheers